22554
How to Use BLoC for Flutter State Management? An In-Depth Tutorial
30 Jan, 2023
7 min read
22554
30 Jan, 2023
7 min read
Table of content
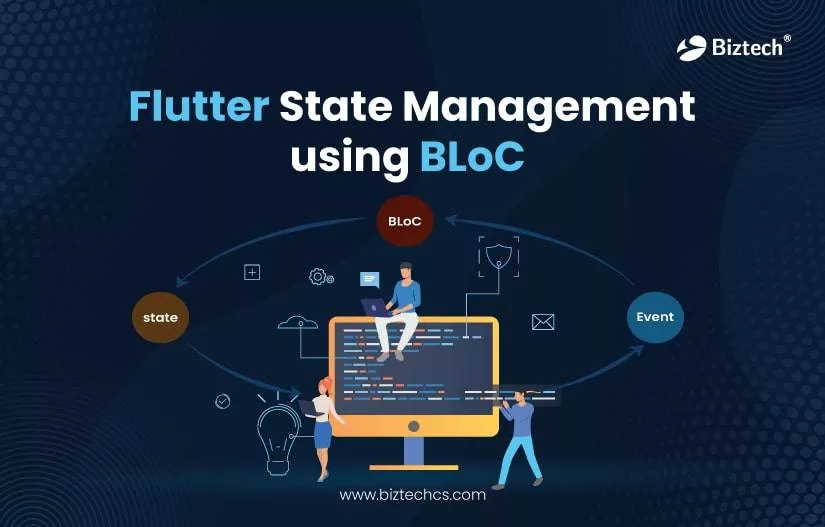
State management is crucial in Flutter app development because you don’t want your data to be scattered everywhere. With the help of state management, you will be able to control the flow of data in your application and centralize the UI state.
With Flutter development, you have several state management libraries such as BLoC (Business logic component), MobX, Cube, GetX, Inherited Widget, etc. In this blog, we will talk about one of the most popular libraries BLoC, which is recommended by Google as well.
Here, we will see in detail about state management using BLoC and how you can set it up for use.
So without further ado, let’s check!
In Flutter BLoC, everything is a widget. The widget can be classified into two categories:
The Stateless widget does not have any internal state. It means once it is built, we cannot change or modify it until they are initialized again.
A Stateful widget is dynamic and has a state. It means we can modify it easily throughout its lifecycle without reinitializing it.
A state is information that can be read when the widget is built and might change or modify over the lifetime of the app. The setState() function allows us to set the properties of the state object that triggers a redraw of the UI.
State management is one of the most popular and necessary processes in the lifecycle of an application. By official documentation, Flutter is declarative. It means Flutter builds its UI by reflecting the current state of your app.
To manage the large size of applications we must need to manage states. There are many state management libraries in flutter such as Provider, BLoC, Redux, GetX Etc.
In this blog, we will talk about BLoC Architecture.

BLoC stands for Business Logic Components. It’s a state management system for Flutter recommended by Google developers. It helps in managing the state and makes access to data from a central place in your project.
Before moving forward in the Flutter BLoC, let’s examine some of the pros and cons of the bloc pattern.
Read More: What’s New in Flutter 3.19 Update
We will build a simple application to demonstrate how BLoC uses streams to manage states and write some tests for the bloc.
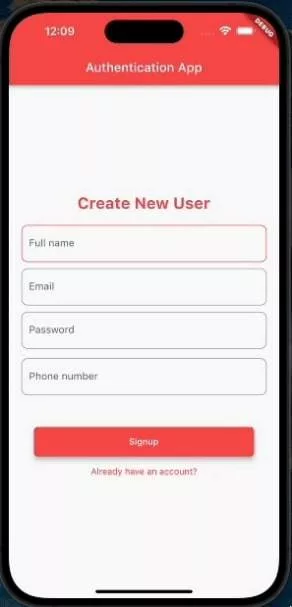
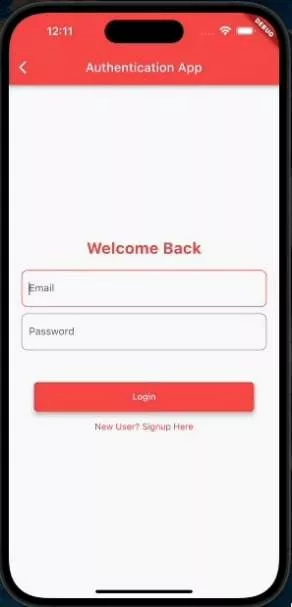
We will build an authentication application; create a new user and log in with credentials. You can refer below GIF for the same.
To create a new Flutter project from the Flutter starter app template:
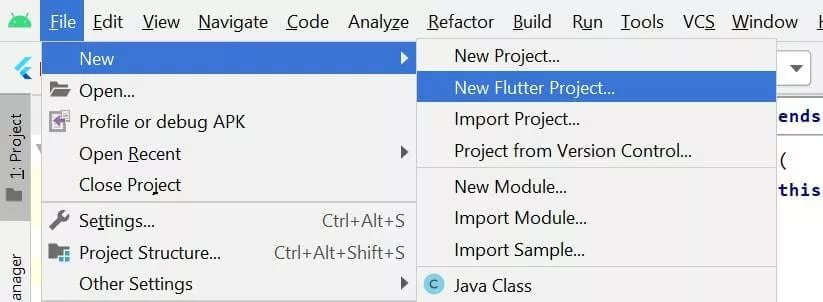
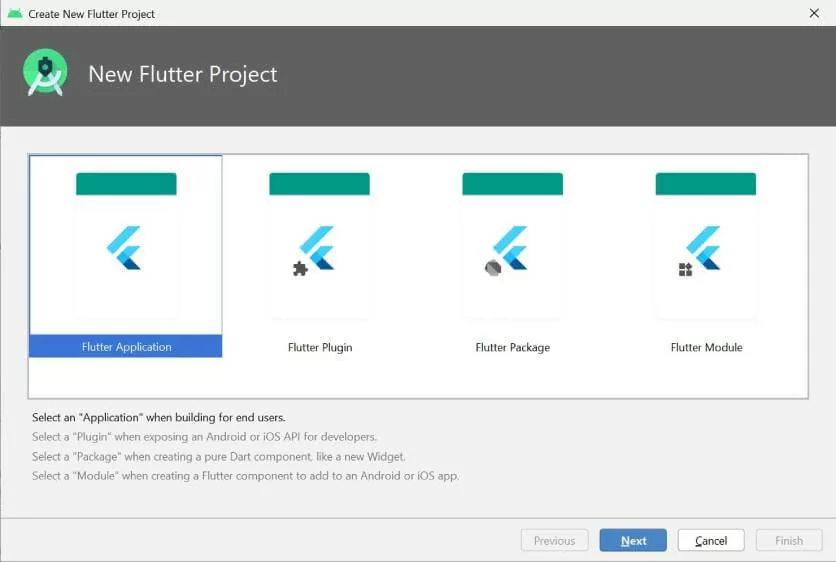
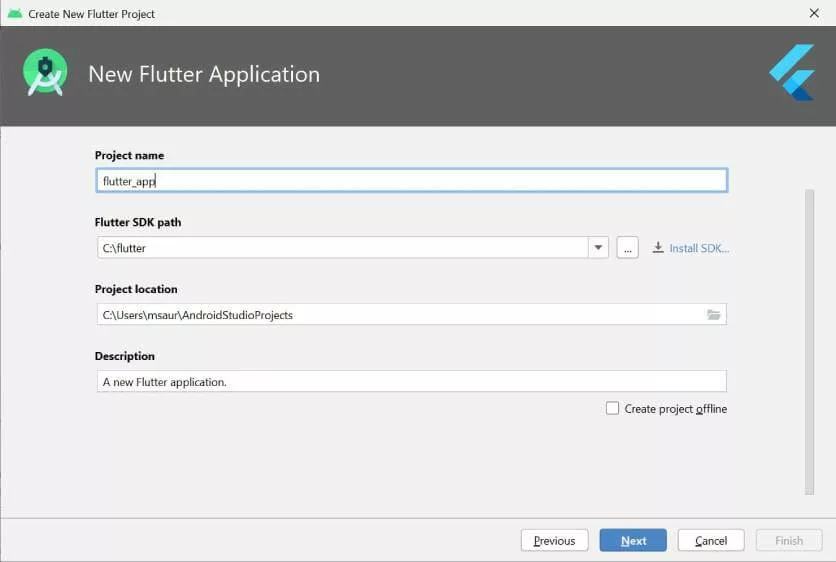
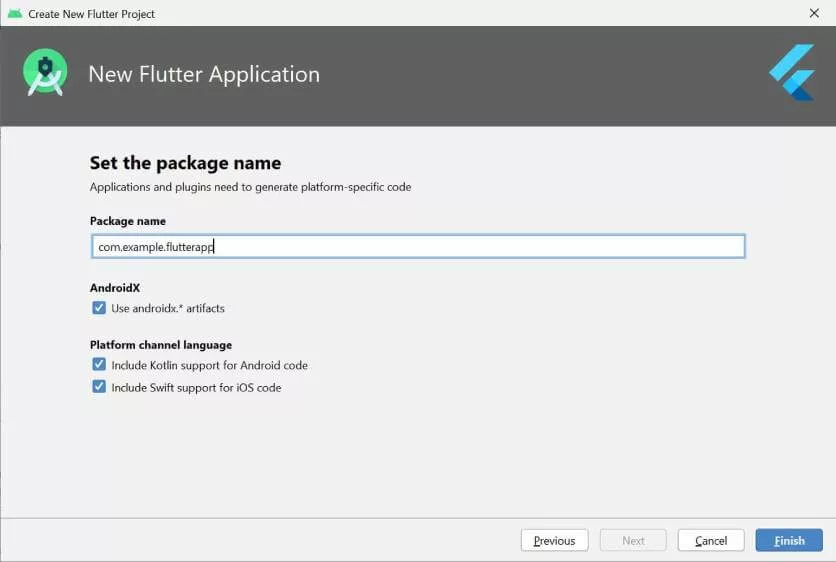
It will give you the option for a generation bloc for your project.
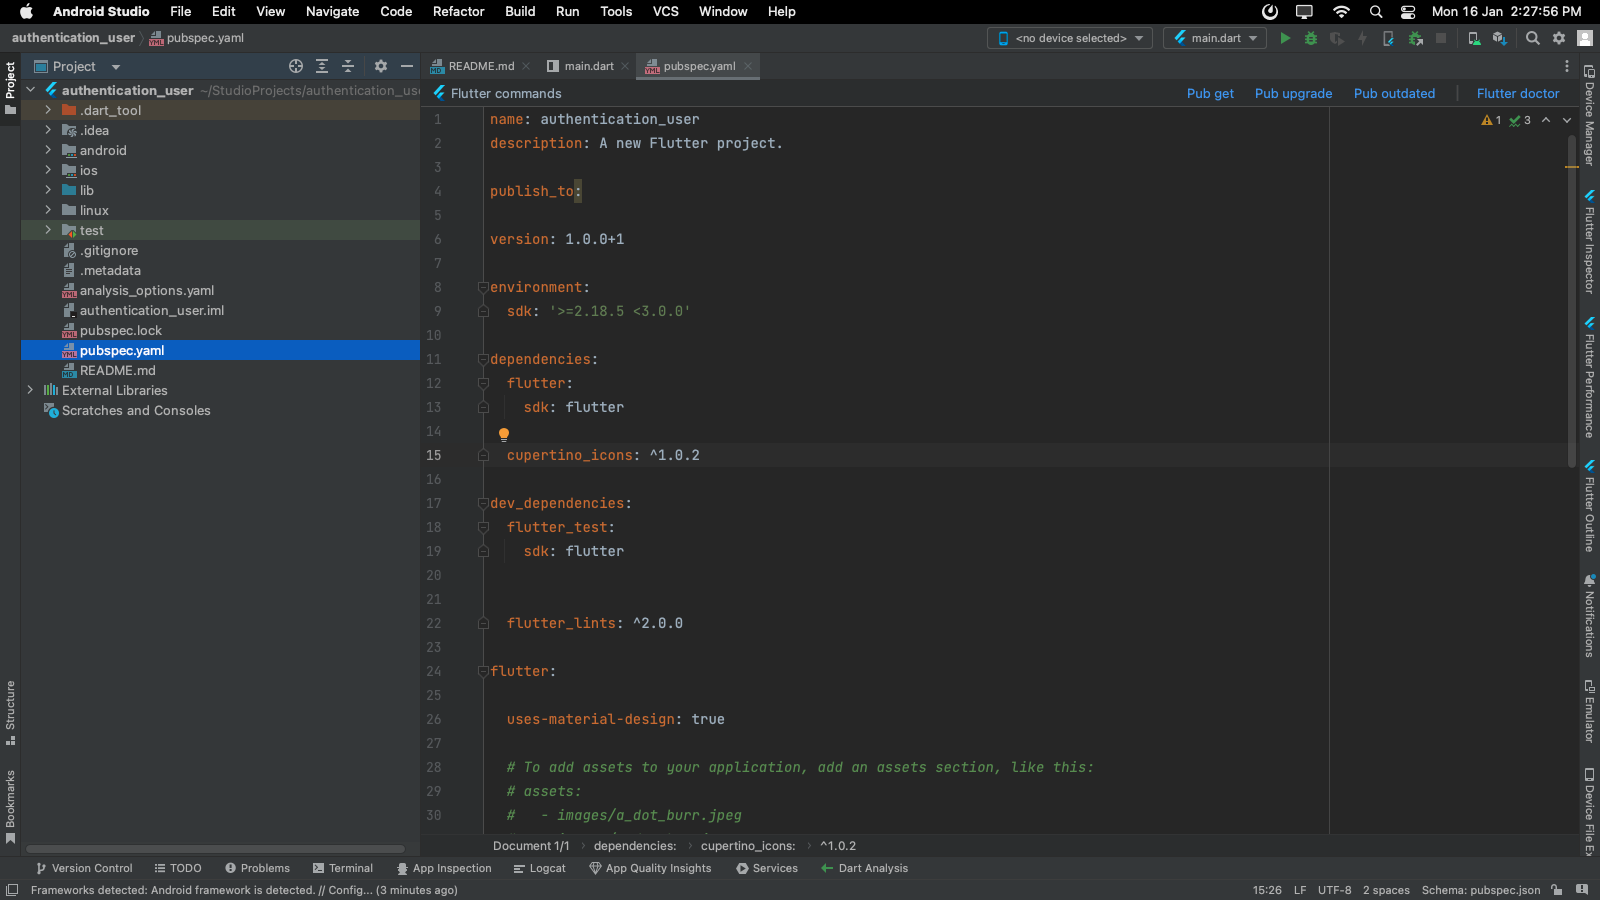
dependencies:
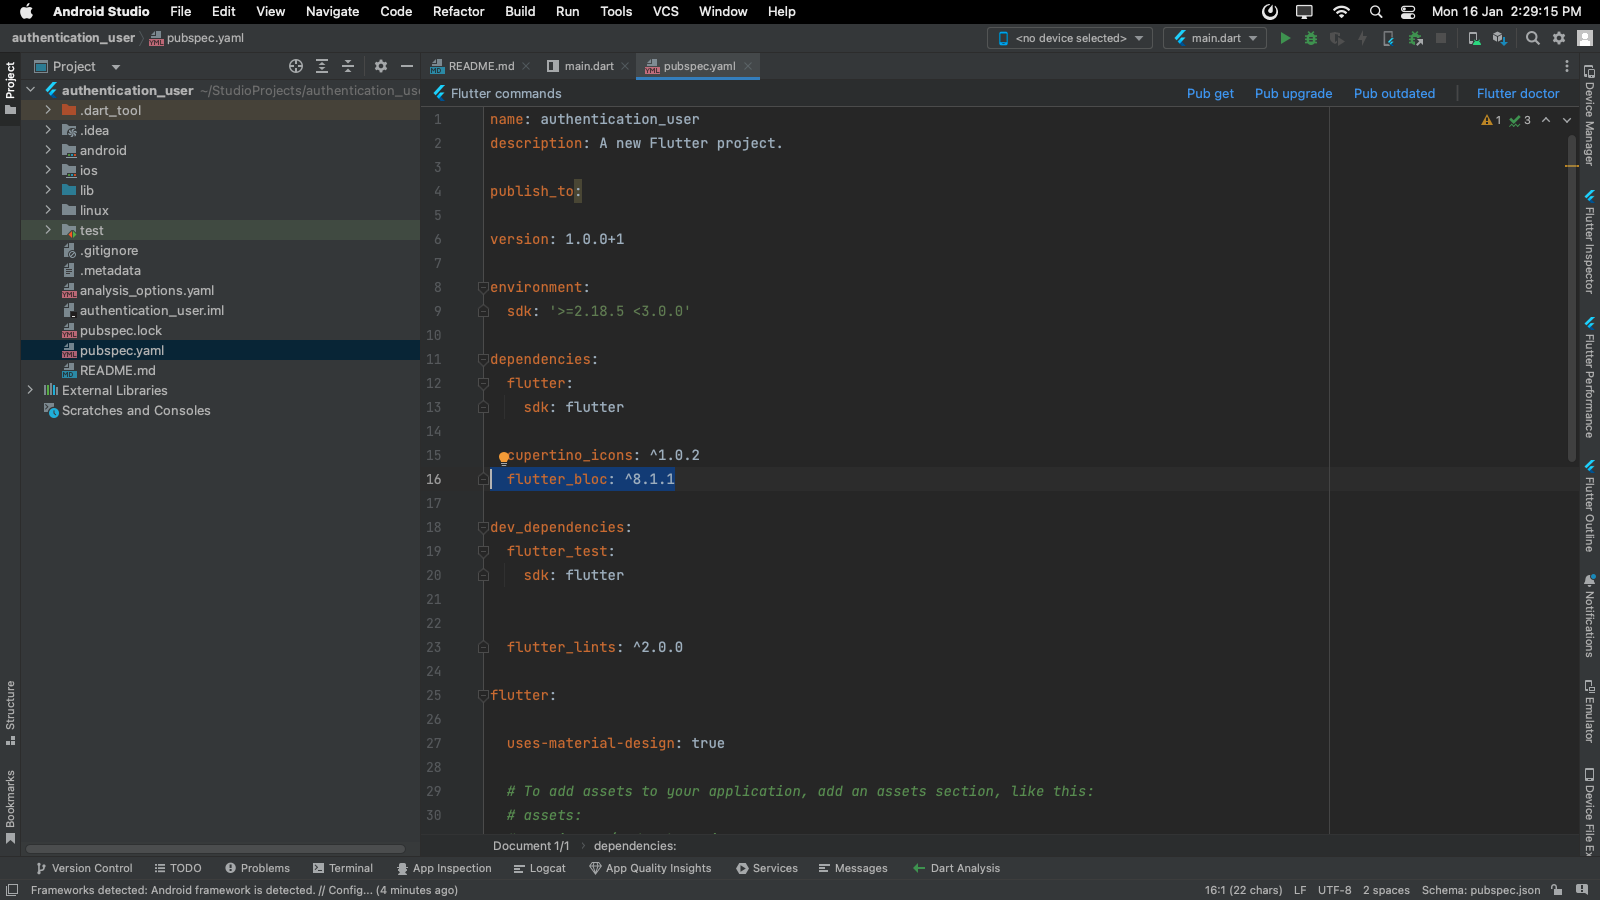
flutter_bloc: ^8.1.1
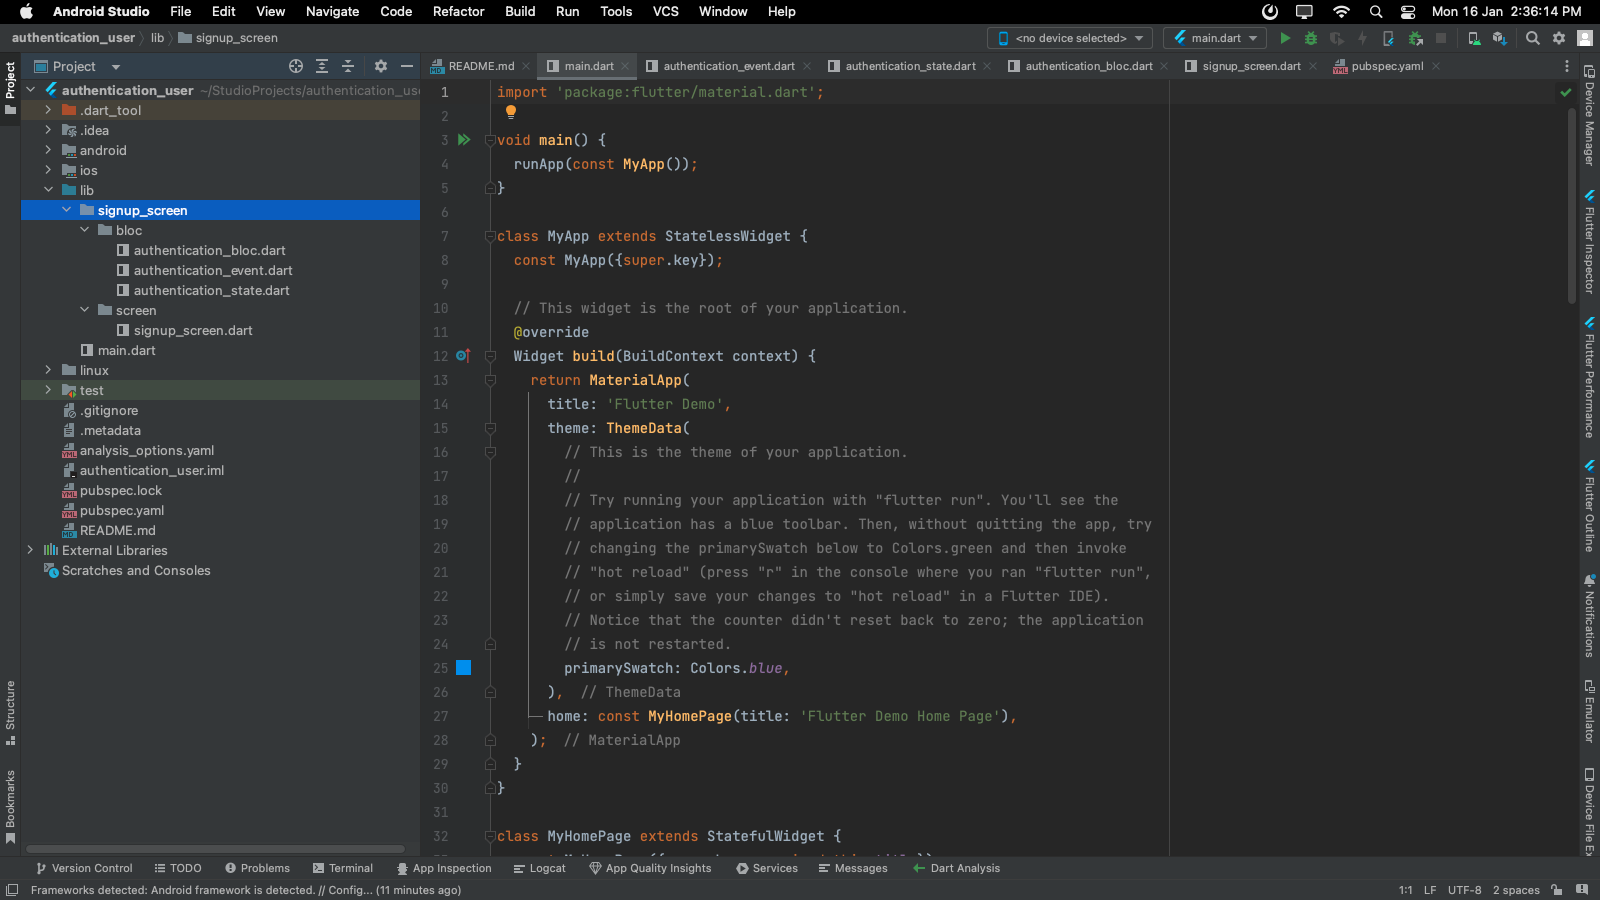
Create the same file for the login screen also.
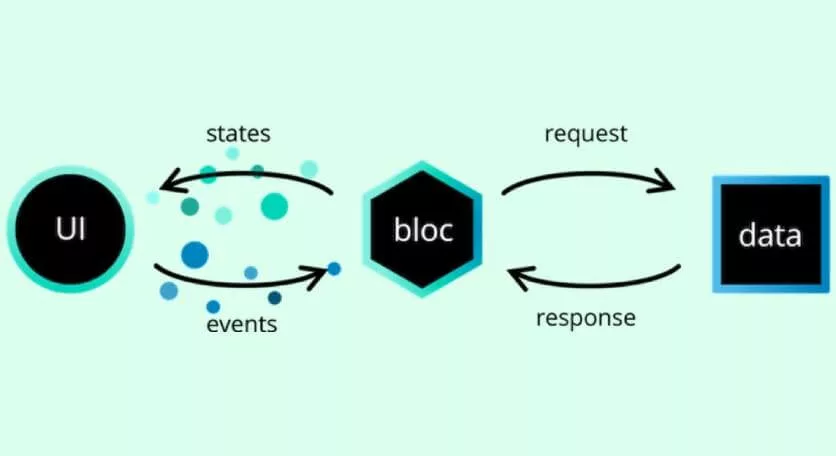
To understand how BLoC works, we need to know what are events and states.
Bloc manages these events and states.
Any Event which is performed in UI is managed in the bloc. Firstly, bloc requests data from database or backend side, and then bloc emits state according to events as Shown in the image below.
part of 'signup_bloc.dart';

@immutable

abstract class SignupEvent {}

//GetSignup Event for Creating New User

class GetSignup extends SignupEvent {

String? fullname;

String? email;

String? password;

String? phoneNumber;

GetSignup({this.email, this.password, this.fullname, this.phoneNumber}); }
Here we have created a GetSignup, which will be fired when a button is clicked. We have an abstract SignupEvent class because Bloc expects a single event to be added to the stream.
There can be multiple events in an app, we create an abstract class and extend it whenever we want to create any new event for handling and passing multiple events to the bloc.
part of 'signup_bloc.dart';

@immutable

abstract class SignupState {}

class SignupInitial extends SignupState {}

class SignupValidation extends SignupState {

String? value;

SignupValidation(this.value);

}

class SignupLoading extends SignupState {}

class SignupLoaded extends SignupState {}

class SignupError extends SignupState {

String? error;

SignupError(this.error);

}
Here we have 5 different states which emit one by one as defined in SignupBloc.
Firstly we need to add packager of Shared Preferences and import file to the SignupBloc.
import 'package:bloc/bloc.dart';

import 'package:flutter/material.dart';

import 'package:shared_preferences/shared_preferences.dart';

part 'signup_event.dart';

part 'signup_state.dart';

class SignupBloc extends Bloc<SignupEvent, SignupState> {  SignupBloc() : super(SignupInitial()) {

on((event, emit) async {

if (event is GetSignup) {

String value = validation(event);

if (value != '') {

emit(SignupValidation(value));

} else {

emit(SignupLoading());

//holds the user for below given time

await Future.delayed(const Duration(seconds: 0), () async {  //storing data in SharedPreferences

SharedPreferences prefs = await SharedPreferences.getInstance();  prefs.setString('email', "${event.email}");

prefs.setString('password', "${event.password}");  emit(SignupLoaded());

}).onError((error, stackTrace) {

emit(SignupError(error.toString()));

});

}

}

});

}

}

//validation for text field

String validation(GetSignup data) {

if (data.fullname?.isEmpty == true) {

return 'Please Enter Your Fullname';

}

if (data.email?.isEmpty == true) {

return 'Please Enter Your Email-id';

}

if (data.password?.isEmpty == true) {

return 'Please Enter Your Password';

}

if (data.phoneNumber?.isEmpty == true) {

return 'Please Enter Your Contact Number';

}

return '';

}
Explanation
This is the part that contains the business logic of our application.
Now events, states, bloc, and our application’s UI are not connected. Let’s start connecting them together.
import 'package:authentication_user/home_screen/screen/home_screen.dart'; import 'package:authentication_user/login_screen/screen/login_screen.dart'; import 'package:authentication_user/signup_screen/bloc/signup_bloc.dart'; import 'package:flutter/material.dart';

import 'package:flutter_bloc/flutter_bloc.dart';

class SignupScreen extends StatefulWidget {

@override

State createState() => _SignupScreenState(); }

class _SignupScreenState extends State {

//instance of LoginBloc

final _signupBloc = SignupBloc();

//controller for text field

TextEditingController fullNameController = TextEditingController();  TextEditingController emailController = TextEditingController();  TextEditingController passwordController = TextEditingController();  TextEditingController phoneNumberController = TextEditingController();

@override

Widget build(BuildContext context) {

return BlocProvider(

//providing signup bloc

create: (context) {

return _signupBloc;

},

child: BlocListener<SignupBloc, SignupState>(

//providing signup bloc listener

listener: (context, state) {

if (state is SignupValidation) {

ScaffoldMessenger.of(context).showSnackBar(SnackBar(  content: Text("${state.value}"),

));

}

if (state is SignupLoading) {}

if (state is SignupLoaded) {

//if successfully created user then loaded state called  ScaffoldMessenger.of(context).showSnackBar(SnackBar(  content: Text("Successfully Registered New User"),  ));

Navigator.push(context, MaterialPageRoute(  builder: (context) {

return HomeScreen(); //push to HomeScreen  },

));

}

},

child: Scaffold(

appBar: AppBar(

title: Text('Authentication App'),

backgroundColor: Colors.redAccent,

),

body: Column(

mainAxisAlignment: MainAxisAlignment.center,  children: [

Container(

child: Text(

'Create New User',

style: TextStyle(

fontSize: 25,

color: Colors.redAccent,

fontWeight: FontWeight.bold),

),

),

Container(

padding: EdgeInsets.symmetric(horizontal: 20),  child: Column(

children: [

SizedBox(

height: 20,

),

TextField(

textInputAction: TextInputAction.next,  keyboardType: TextInputType.name,  controller: fullNameController,

decoration: InputDecoration(

hintText: 'Full name',

// errorText: validate ? errorText : null,  focusedBorder: OutlineInputBorder(

borderSide: BorderSide(color: Colors.redAccent),  borderRadius: BorderRadius.circular(10)),  border: OutlineInputBorder(

borderSide: BorderSide(color: Colors.black38),  borderRadius: BorderRadius.circular(10)),  ),

),

SizedBox(

height: 10,

),

TextField(

textInputAction: TextInputAction.next,  keyboardType: TextInputType.emailAddress,  controller: emailController,

decoration: InputDecoration(

hintText: 'Email',

// errorText: validate ? errorText : null,  focusedBorder: OutlineInputBorder(  borderSide: BorderSide(color: Colors.redAccent),  borderRadius: BorderRadius.circular(10),  ),

border: OutlineInputBorder(

borderSide: BorderSide(color: Colors.black38),  borderRadius: BorderRadius.circular(10)),  ),

),

SizedBox(

height: 10,

),

TextField(

textInputAction: TextInputAction.next,  keyboardType: TextInputType.visiblePassword,  controller: passwordController,

decoration: InputDecoration(

hintText: 'Password',

// errorText: validate ? errorText : null,  focusedBorder: OutlineInputBorder(  borderSide: BorderSide(color: Colors.redAccent),  borderRadius: BorderRadius.circular(10)),

border: OutlineInputBorder(

borderSide: BorderSide(color: Colors.black38),  borderRadius: BorderRadius.circular(10)),  ),

),

SizedBox(

height: 15,

),

TextField(

textInputAction: TextInputAction.done,  keyboardType: TextInputType.phone,  controller: phoneNumberController,

decoration: InputDecoration(

hintText: 'Phone number',

// errorText: validate ? errorText : null,  focusedBorder: OutlineInputBorder(  borderSide: BorderSide(color: Colors.redAccent),  borderRadius: BorderRadius.circular(10)),

border: OutlineInputBorder(

borderSide: BorderSide(color: Colors.black38),  borderRadius: BorderRadius.circular(10)),  )),

SizedBox(

height: 30,

),

Container(

padding: EdgeInsets.all(20),

child: Column(

children: [

Row(

children: [

Expanded(

child: ElevatedButton(

style: ButtonStyle(

elevation: MaterialStatePropertyAll(6),  backgroundColor:

MaterialStatePropertyAll(  Colors.redAccent),

shape: MaterialStatePropertyAll(  RoundedRectangleBorder(  borderRadius:

BorderRadius.circular(6)))),  onPressed: () {

setState(() {

//adding event on widget onPressed Method  _signupBloc.add(GetSignup(  email: emailController.text,  fullname: fullNameController.text,  password: passwordController.text,  phoneNumber:

phoneNumberController.text));  });

},

child: Container(

padding: EdgeInsets.symmetric(

horizontal: 20, vertical: 15),

child: Text(

'Signup',

))),

),

],

),

SizedBox(

height: 15,

),

GestureDetector(

onTap: () {

Navigator.push(context, MaterialPageRoute(  builder: (context) {

return LoginScreen();

},

));

},

child: Text(

'Already have an account?',

style: TextStyle(color: Colors.redAccent),  ),

),

],

),

)

],

),

),

],

),

),

),

);

}

}
BlocProvider(…)
we use it to provide an instance of our bloc by placing it just below the root of the application so that it is accessible throughout it.
BlocListner(…)
It is the portion where everything management of states happens.
Explanation:
Read also: Everything about Flutter 3
part of 'login_bloc.dart';

@immutable

abstract class LoginEvent {}

//event for GetUserLogin

class GetLogin extends LoginEvent {

String? email;

String? password;

GetLogin({this.email, this.password});

}
Here we have created a GetLogin, which will be fired when a button is clicked.
part of 'login_bloc.dart';

@immutable

abstract class LoginState {}

class LoginInitial extends LoginState {}

class LoginValidation extends LoginState {

String? value;

LoginValidation(this.value);

}

class LoginLoading extends LoginState {}

class LoginLoaded extends LoginState {}

class LoginError extends LoginState {

String? error;

LoginError(this.error);

}
Here we have 5 different states which emit one by one by defined in LoginBloc.
Firstly we need to add packager of Shared Preferences and import file to the LoginBloc.
import 'package:bloc/bloc.dart';

import 'package:flutter/material.dart';

import 'package:shared_preferences/shared_preferences.dart'; part 'login_event.dart';

part 'login_state.dart';

String? sfEmail;

String? sfPassword;

class LoginBloc extends Bloc<LoginEvent, LoginState> {  LoginBloc() : super(LoginInitial()) {

//calling function to get value by SharedPreferences  getStringValuesSF();

on((event, emit) async {

if (event is GetLogin) {

String value = validation(event);

if (value != '') {

emit(LoginValidation(value.toString()));

} else {

emit(LoginLoading());

//holds the user for below given time

await Future.delayed(const Duration(seconds: 3), () async {  //if credentials matches then loaded state emitted  if (event.email == sfEmail && event.password == sfPassword) {  emit(LoginLoaded());

}

}).onError((error, stackTrace) {

emit(LoginError(error.toString()));

});

}

}

});

}

}

//validation for text fields

String validation(GetLogin data) {

if (data.email?.isEmpty == true) {

return 'Please Enter Your Email-id';

}

if (data.password?.isEmpty == true) {

return 'Please Enter Your Password';

}

if (data.email != sfEmail) {

return 'Please enter your valid email id';

}

if (data.password != sfPassword) {

return 'wrong password';

}

return '';

}

//function for getting value from SharedPreferences getStringValuesSF() async {

SharedPreferences prefs = await SharedPreferences.getInstance();  sfEmail = prefs.getString('email').toString();

sfPassword = prefs.getString('password').toString(); }
Explanation
Now events, states, bloc, and our application’s UI are not connected. Let’s start again connecting them together.
import 'package:authentication_user/home_screen/screen/home_screen.dart'; import 'package:authentication_user/login_screen/bloc/login_bloc.dart'; import 'package:flutter/material.dart';

import 'package:flutter_bloc/flutter_bloc.dart';

class LoginScreen extends StatefulWidget {

@override

State createState() => _LoginScreenState(); }

class _LoginScreenState extends State {

//instance of Login Bloc

final _loginBloc = LoginBloc();

//controllers for text fields

TextEditingController emailController = TextEditingController();  TextEditingController passwordController = TextEditingController();

@override

Widget build(BuildContext context) {

return BlocProvider(

//providing login bloc

create: (context) {

return _loginBloc;

},

child: BlocListener<LoginBloc, LoginState>(

//providing listener for login bloc

listener: (context, state) {

if (state is LoginValidation) {

ScaffoldMessenger.of(context).showSnackBar(SnackBar(  content: Text("${state.value}"),

));

}

if (state is LoginLoading) {}

if (state is LoginLoaded) {

//if successfully credentials matches the loaded state called  ScaffoldMessenger.of(context).showSnackBar(SnackBar(  content: Text("Successfully Logged in"),

));

Navigator.push(context, MaterialPageRoute(

builder: (context) {

return HomeScreen(); //push to HomeScreen

},

));

}

},

child: Scaffold(

appBar: AppBar(

title: Text('Authentication App'),

backgroundColor: Colors.redAccent,

),

body: Column(

mainAxisAlignment: MainAxisAlignment.center,  children: [

Container(

child: Text(

'Welcome Back',

style: TextStyle(

fontSize: 25,

color: Colors.redAccent,

fontWeight: FontWeight.bold),

),

),

Container(

padding: EdgeInsets.symmetric(horizontal: 20),  child: Column(

children: [

SizedBox(

height: 20,

),

TextField(

textInputAction: TextInputAction.next,  keyboardType: TextInputType.emailAddress,  controller: emailController,

decoration: InputDecoration(

hintText: 'Email',

// errorText: validate ? errorText : null,  focusedBorder: OutlineInputBorder(  borderSide: BorderSide(color: Colors.redAccent),  borderRadius: BorderRadius.circular(10),  ),

border: OutlineInputBorder(

borderSide: BorderSide(color: Colors.black38),  borderRadius: BorderRadius.circular(10)),  ),

),

SizedBox(

height: 10,

),

TextField(

textInputAction: TextInputAction.next,  keyboardType: TextInputType.visiblePassword,  controller: passwordController,

decoration: InputDecoration(

hintText: 'Password',

// errorText: validate ? errorText : null,  focusedBorder: OutlineInputBorder(

borderSide: BorderSide(color: Colors.redAccent),  borderRadius: BorderRadius.circular(10)),

border: OutlineInputBorder(

borderSide: BorderSide(color: Colors.black38),  borderRadius: BorderRadius.circular(10)),  ),

),

SizedBox(

height: 30,

),

Container(

padding: EdgeInsets.all(20),

child: Column(

children: [

Row(

children: [

Expanded(

child: ElevatedButton(

style: ButtonStyle(

elevation: MaterialStatePropertyAll(6),  backgroundColor: MaterialStatePropertyAll(  Colors.redAccent),

shape: MaterialStatePropertyAll(  RoundedRectangleBorder(  borderRadius:

BorderRadius.circular(6)))),  onPressed: () {

setState(() {

//adding event on Widget OnPressed Method  _loginBloc.add(GetLogin(

email: emailController.text,

password: passwordController.text,  ));

});

},

child: Container(

padding: EdgeInsets.symmetric(  horizontal: 20, vertical: 15),

child: Text(

'Login',

),

),

),

),

],

),

SizedBox(

height: 15,

),

GestureDetector(

onTap: () {

Navigator.pop(context);

},

child: Text(

'New User? Signup Here',

style: TextStyle(color: Colors.redAccent),  ),

),

],

),

)

],

),

),

],

),

),

),

);

}

}
BlocProvider(…)
we use it to provide an instance of our bloc by placing it just below the root of the application so that it is accessible throughout it.
BlocListner(…)
It is the portion where everything management of states happens.
Explanation:
The Flutter BLoC is helpful for you to get started with state management using the BLoC pattern. From this blog, we learned about the Authentication of users in a simple way By BLoC Architecture.
Keep learning , keep coding 🙂
Development
114
By Devik Gondaliya
09 Jul, 2025

Odoo
7807
By Biztech
04 Jul, 2025
Odoo
451
By Devik Gondaliya
02 Jul, 2025